Blog
Make Your Own Board Books A Parent's Guide
Discover how to make your own board books with this complete guide. Learn DIY techniques and pro printing tips to create a durable, personalized keepsake.

So, you're thinking about how to make your own board books. You’ve got two main options: a hands-on DIY project with cardstock and glue, or using a professional online service that prints your photos right onto thick, kid-safe pages. The best choice really comes down to what you’re looking for in terms of quality, how much time you have, and your budget.
Why Create a Custom Board Book

Imagine your toddler’s face lighting up as they turn the page and see themselves. Their family, their dog, their favorite playground—all right there in a sturdy little book made just for them. Creating a personalized board book goes way beyond a simple gift; it turns everyday memories into a powerful way to connect and learn.
These custom books often become the cornerstone of a child’s first library. When little ones see familiar faces and places in print, reading becomes deeply personal and exciting. It’s that emotional connection that helps build a real, genuine love for stories from the very beginning.
The Power of Personalization in Early Learning
A custom board book does more than just tell a story; it validates a child’s world. Seeing their own life reflected on the pages reinforces their importance and helps build self-esteem. It’s an incredible way to celebrate milestones and strengthen family bonds. Think about turning a trip to the zoo into a story where your toddler is the star explorer, or a book about all the people who love them.
This isn’t just a niche idea—it’s part of a huge trend. The global books market hit USD 136.23 billion in 2024 and is expected to reach USD 202.24 billion by 2032. Within that massive market, personalized kids' content is booming, which shows just how much parents everywhere value these unique keepsakes. You can see the full breakdown in this market analysis from Fortune Business Insights.
A personalized board book acts as a bridge between a child's real life and the magic of reading. It’s a tangible piece of their personal history they can hold, touch, and revisit anytime.
Two Paths to Your Perfect Book
Before you jump into the fun part, it’s good to know the two main ways you can bring your book to life. Each path offers a different experience and a different final product.
The DIY Method: This is the hands-on approach where you craft the book from scratch. It’s a super rewarding project that gives you total creative control, but it definitely requires time, the right materials, and a close eye on safety.
Professional Printing Services: Using a dedicated service simplifies everything. You just upload your photos and text, and they handle the printing, binding, and assembly to create a polished, bookstore-quality book.
This guide will walk you through both options, so you can figure out which one feels right for you and your family. If you're curious to learn more about why these books are so special, check out our guide on the advantages of personalized board books.
Crafting Your Story and Choosing the Perfect Photos

This is where the heart of your book comes to life. Don't feel pressured to write a complicated plot—for toddlers, the best stories are simple, familiar, and comforting. The real magic is in seeing their own world on the page.
A "Day in My Life" theme is a classic for a reason. It’s a wonderful way to capture the small, sweet moments: waking up, eating breakfast, playing at the park, and snuggling in for a bedtime story. This simple rhythm is easy for little minds to follow and makes them feel seen.
Another beautiful idea is a book all about connection. A "People Who Love Me" book can feature photos of parents, grandparents, siblings, and even the family dog. Each page can have a simple line like, "Mommy loves me," or "Grandpa gives the best hugs." It’s a tangible reminder of their circle of love.
Building a Simple Narrative
Think of your book as having a clear beginning, middle, and end. Start with a familiar "hello" or morning routine, move through a fun activity, and finish with a calming "goodnight" or a big family hug. This structure feels complete and satisfying for a toddler.
When you're writing the text, lean into rhythm and repetition. Phrases like "Splish, splash in the bath!" or "Zoom, zoom goes the little red car!" are so much fun for them to hear and eventually say. These predictable patterns are more than just cute—they’re building foundational literacy skills with every read-aloud.
The goal isn't to write a bestseller; it's to create a conversation starter. Your custom board book should feel like a tangible piece of your family's unique story, inviting your child to point, babble, and connect with the pages.
This desire for deeply personal stories is a huge part of why the children's book market is thriving. The picture book segment, which is a perfect fit for durable board formats, is projected to grow from USD 12.34 billion in 2025 to USD 21.68 billion by 2034. It's clear that parents are looking for books that truly resonate.
Selecting Photos That Tell the Story
Once you have a theme, it's time to dive into your camera roll. The right images will do most of the storytelling for you, so choose them with care. You're looking for photos that are bright, clear, and full of feeling.
Try to find high-resolution images where your child is the star of the show. Close-ups of smiling faces or action shots that capture a specific moment work beautifully. Steer clear of photos that are blurry, too dark, or have cluttered backgrounds that might distract from your little one.
Here’s a quick checklist to keep in mind as you sort through photos:
High Resolution: Is the image sharp and clear, without looking fuzzy or pixelated?
Bright and Colorful: Does the photo have vibrant colors that will pop off the page and grab a toddler's attention?
Clear Subject: Is your child easy to spot and clearly the focus of the picture?
Emotional Connection: Does the photo capture a feeling—like pure joy, cozy comfort, or wide-eyed curiosity?
After you've picked your favorites, a little editing can make them even better. You might want to crop an image to get a tighter shot of your child's face or remove a stray toy from the background. There are some great AI tools to remove unwanted objects from photos that make this quick and easy. And if you have questions about uploading your child's pictures, it's always smart to understand the facts; we've broken down common concerns about child photo privacy and AI.
Designing Pages That Captivate Young Readers
You’ve got your story mapped out and your photos picked. Now for the fun part: bringing it all to life on the page. Don’t worry if you’re not a graphic designer. Creating a layout that delights a toddler isn't about fancy skills—it’s about simplicity, clarity, and a little bit of rhythm. The goal is to make each page an invitation, not a puzzle.
Think of each two-page spread as a single canvas. A great place to start is by placing your photo on one side and the text on the other. This simple, repeating structure helps little ones know what to expect, making it easier for them to focus on your face and your words. Sticking with this consistent layout creates a calming, predictable flow they'll love.
Creating a Clear and Simple Layout
When you’re designing for a toddler, the most important rule is to embrace empty space. A cluttered page with too much going on can be overwhelming for a developing brain. Leaving plenty of room around your photos and text—sometimes called "white space"—gives their eyes a place to rest and helps them focus on what matters.
This is all about subtraction, not addition. Before you start adding cute clip art or colorful borders, ask yourself: does this help tell the story? If not, it’s probably just a distraction. The real stars here are your child’s face and the simple words you’ve written just for them.
Choosing Fonts and Text That Pop
Readability is everything. Little eyes are still learning to tell letter shapes apart, so your font choice matters more than you might think.
Stick to Simple Fonts: Choose clean, sans-serif fonts like Futura, Helvetica, or Arial. It's best to avoid curly, script-like, or overly decorative fonts that can be hard for new readers to decipher.
Go Big: Use a large font size—at least 24 points or even bigger. Your child should be able to see the words clearly from a cozy lap-reading distance.
Use High Contrast: Place dark text on a light background (or vice-versa). Black text on a white or pale-colored page is the gold standard for a reason. It offers the highest possible contrast, which is crucial for young, developing eyes.
The text itself should be just as simple. We're talking short, punchy sentences. And don't forget to sprinkle in fun, onomatopoeic words like "Vroom!", "Woof!", or "Splash!" that are exciting to say and hear. These playful sounds make storytime feel like a game.
A well-designed page guides a child's attention without overwhelming their senses. It’s a quiet background that lets the story—and the beloved faces in the photos—shine through as the main event.
Finding the Right Design Tool
The tool you use can make a huge difference in how easy (or frustrating) this process feels. You basically have two paths: doing it all yourself with a general design tool, or using a specialized editor from a professional board book service.
DIY Design Tool vs Professional Service Editor
For a full DIY approach, accessible software like Canva is fantastic. It’s intuitive, offers tons of toddler-friendly fonts, and lets you easily drag and drop your photos into place. But it also means you're in charge of everything, including print-ready formatting.
On the other hand, professional services like Once Upon A Memory provide their own online editors. These are built specifically for book creation, with pre-made layouts and guardrails to ensure your photos and text are positioned perfectly for printing.
Here's a quick comparison to help you decide:
Feature | DIY Tools (e.g., Canva, PowerPoint) | Professional Service Editor (e.g., Once Upon A Memory) |
|---|---|---|
Ease of Use | User-friendly, but requires learning some design basics. | Extremely simple, with guided steps and pre-set templates. Often a "fill-in-the-blanks" feel. |
Creative Control | Total control. You can customize every single element. | Some limitations. Templates guide you to ensure a good final product. |
Print-Readiness | Your responsibility. You'll need to export files correctly. | Automatic. The editor handles all the technical print specs for you. |
Best For | Parents who enjoy design and want maximum customization. | Parents who want a fast, easy, and guaranteed-to-print-well experience. |
Potential Pitfalls | Easy to create layouts that look good on screen but print poorly. | Less flexibility if you have a very specific or unconventional design idea. |
Ultimately, there’s no wrong answer here. It all comes down to your comfort level with technology and how much hands-on control you want over the final design details. Both paths can lead to a beautiful book your toddler will treasure.
Choosing Your Creation Method: DIY vs. Professional
Alright, this is where the rubber meets the road. Are you ready to roll up your sleeves and go the full DIY route, or does the idea of a polished, professionally printed board book sound more appealing?
There’s no right answer here. Each path has its own magic, and the best choice really boils down to what you’re looking for in terms of time, budget, and the final result.
The DIY path is a true labor of love. It’s a craft project, a memory-making activity in itself. If you're the kind of person who enjoys the process as much as the product, this is for you. You might even find some creative overlap in guides on how to make your own personalized items, which often share similar principles about choosing materials and getting the design just right.
But let’s be real: going it alone requires the right tools and a healthy dose of patience.
The Rewarding Path of a DIY Board Book
Making a board book from scratch means you’re the author, designer, and bookbinder all in one. It’s incredibly fulfilling, but it definitely comes with a learning curve.
Here's a peek at what your shopping list might look like:
Thick Cardstock: You’ll need several sheets of heavy cardstock—at least 300 gsm—for each page to get that chunky, sturdy feel.
Photo Paper: Go for high-quality matte or satin photo paper. It makes the images pop without creating too much glare for little eyes.
Non-Toxic Glue: This is non-negotiable. Look for an acid-free, non-toxic adhesive. A spray adhesive is often your best bet for smooth, even coverage without any lumps or bumps.
Cutting Tools: A sharp craft knife, a metal ruler, and a self-healing cutting mat are your best friends for getting clean, straight edges.
Corner Rounder: This little tool is the secret to achieving those safe, toddler-friendly rounded corners. Don't skip it!
The trickiest part is almost always the final assembly. Getting the pages perfectly aligned and creating a binding that can survive being chewed, dropped, and yanked on is a genuine challenge. The final book will have a charming, handmade feel—something to be proud of—but it likely won’t be mistaken for one from a bookstore shelf.
This flowchart can help you figure out which design path feels right based on your comfort level with different tools.
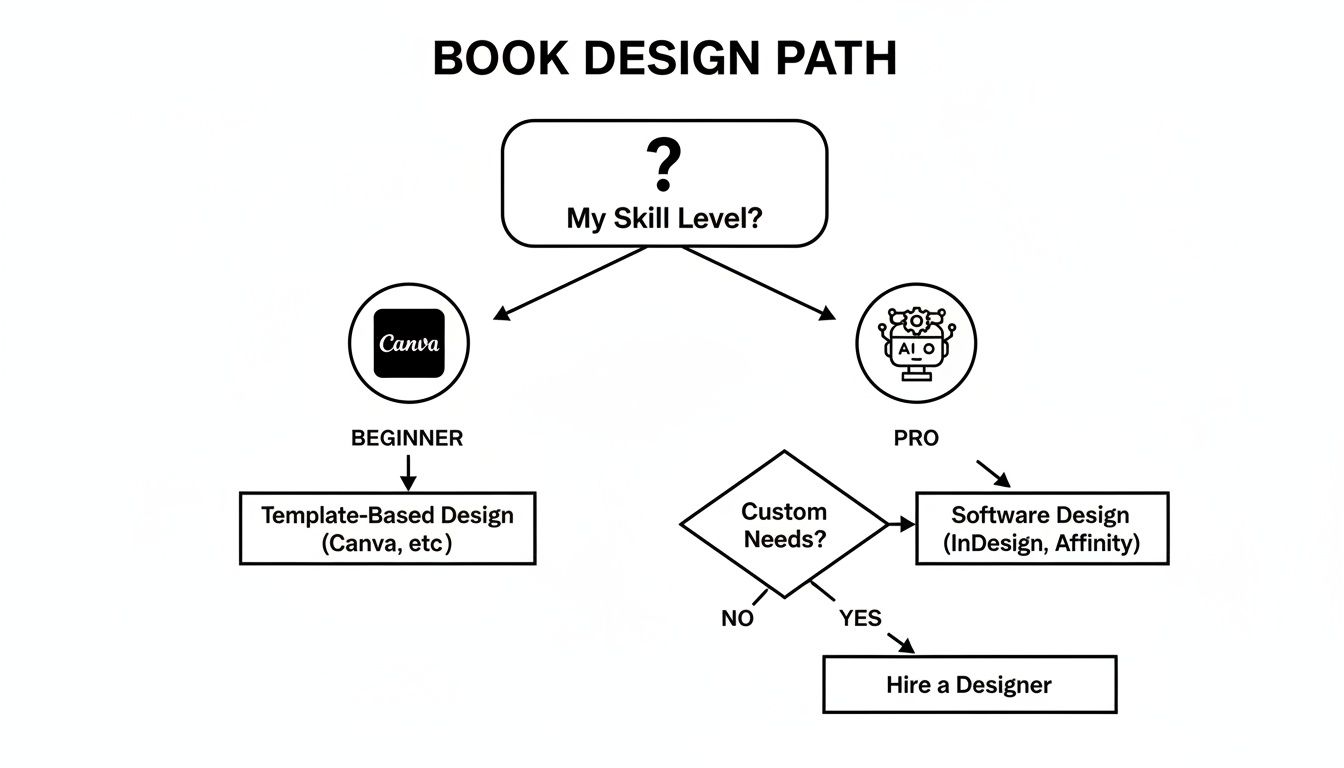
As you can see, tools like Canva are great starting points for beginners, while more experienced folks might jump into advanced software. Of course, a professional service offers an easy on-ramp for everyone.
The Polished Finish of Professional Printing
On the other hand, using a professional service is the most direct path to a flawless, super-durable book. These companies are experts in creating child-safe products built to withstand just about anything a toddler can throw at them (literally).
When you choose a professional printer, you’re not just paying for convenience. You’re investing in superior materials, certified safety standards, and a level of durability that’s nearly impossible to replicate at home.
These services take all the guesswork and tricky assembly off your plate. You just upload your photos and text into their design tool, arrange everything how you like, and they handle the rest. What arrives at your door is a crisp, vibrant book with tear-resistant pages, soy-based inks, and a binding that’s ready for years of story time.
This isn't just a niche hobby; it's a huge market. Interactive children's books were valued at USD 2.18 billion in 2024 and are projected to hit USD 5 billion by 2035. This boom shows just how much families value high-quality, personalized keepsakes—a need that professional printers are perfectly set up to meet.
If this route sounds promising, we have a complete walkthrough on how to create your own custom kids' book using a service like ours.
So, how do you decide? Let’s break it down side-by-side.
Aspect | DIY Method | Professional Service |
|---|---|---|
Final Quality | Handmade charm, durability can vary. | Bookstore-quality, highly durable, and polished. |
Time Commitment | High. You'll spend time shopping, assembling, and waiting for glue to dry. | Low. Design is fast; production is handled for you. |
Cost | Can seem lower, but tools and materials add up. | Generally a higher upfront cost per book. |
Safety | Up to you to source non-toxic materials. | Certified child-safe materials and inks. |
Customization | Total control. Limited only by your skills and imagination. | High, but you're working within the service's templates and options. |
Ultimately, both paths lead to a beautiful, meaningful keepsake. The real question is whether you find more joy in the hands-on crafting process itself or in the magic of unboxing a perfect, ready-to-read masterpiece.
Prioritizing Safety and Durability for Little Hands

When you're making a board book for a toddler, safety and durability aren't just bonus features. They're everything.
This little book is going to be chewed, drooled on, and yanked at with surprising strength. It's just a fact of toddler life. So whether you’re crafting it yourself or ordering from a service, making it completely kid-proof is non-negotiable.
For the DIY crowd, your material choices make all the difference. Every single component needs to be selected with a toddler’s habits in mind, which means actively looking for supplies labeled non-toxic and child-safe.
The goal is to create a book that’s not only a sweet keepsake but also physically safe for tiny explorers. A toddler’s main tools for learning are their hands and mouth, so every corner, page, and seam has to be ready for that reality.
Choosing Safe DIY Materials
Building a safe book starts with a thoughtful shopping list. Don’t just grab any old glue or paper from the craft aisle; you need to look for specific qualities that make your project ready for tiny hands and mouths.
Adhesives: Hunt for glues that are acid-free and non-toxic. Many spray adhesives or glue sticks made for scrapbooking fit the bill perfectly.
Paper and Ink: If you're printing pages at home, go for a high-quality, sturdy cardstock. It's worth remembering, though, that standard home printer ink isn't designed to be ingested—a huge consideration.
Protective Layers: To make the pages drool-proof (a must!), you can cover them with clear, non-toxic contact paper or a food-safe sealant. This adds that crucial layer of defense against moisture and general wear and tear.
Building a Toddler-Proof Book
Beyond the materials, how you put the book together is just as important. A sharp corner is a genuine hazard, and a weak binding can quickly become a choking risk if a page comes loose.
First, meticulously round every single corner. You can pick up a simple corner-rounding tool at any craft store, and it creates a smooth, safe edge that prevents accidental pokes. It’s a small step that makes a world of difference.
Binding is another critical checkpoint. Steer clear of small, detachable parts like staples or binder rings. The safest bet for a homemade book is a super-strong spine created by securely gluing the pages together.
This is where opting for a professional service really pays off. Reputable companies have to follow strict safety standards. They use things like soy-based inks, thick tear-resistant paperboard, and durable lay-flat binding that’s designed to last. It gives you peace of mind, knowing the final product is built to safely withstand all the love your toddler has to give.
A Few Common Questions From Parents Like You
When you're diving into making your first board book, a few questions always pop up. Here are the quick answers I've learned from experience.
How Thick Should the Pages Be?
If you're going the DIY route, you'll want to aim for a final page thickness of at least 1-2mm. A great trick is to glue several layers of heavy cardstock together to get that sturdy, drool-proof feel.
For comparison, professional services (like us!) use a rigid, durable 300-400 gsm paperboard. It's designed to withstand some serious love from tiny hands.
What's the Perfect Length for a Toddler's Board Book?
For little ones, shorter is always sweeter. We've found the magic number is between 10 and 20 pages, which works out to 5-10 spreads (a left and right page).
This gives you enough room for a simple, charming story but is short enough to hold their notoriously short attention spans.
Can I Really Use Photos From My Phone?
Absolutely! Modern smartphone cameras are more than powerful enough to create beautiful, crisp prints.
The key is to use the original, high-resolution photos straight from your phone's gallery. Just be sure to avoid pulling images from social media or text messages—they're often compressed and can end up looking blurry on the printed page.
Ready to turn those camera roll treasures into a book they'll beg to read every night? With Once Upon A Memory Books LLC, it's simple to create a beautiful, durable board book your child will absolutely adore. Start creating your personalized story today.


